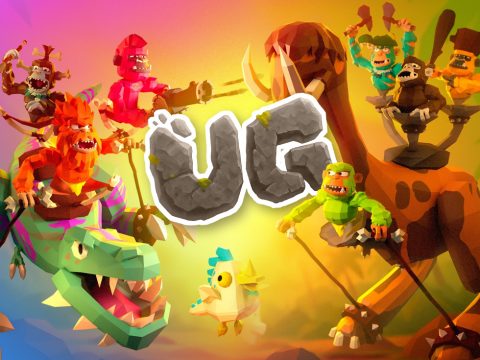
From Development to Release: Nthusia’s Final Dev Diary
Welcome to the final entry in our Dev Diaries with Team Nthusia! In this blog, we’re sharing what it’s like to work with Photon, from the development process to the lessons we’ve learned along the way. We’ve already covered a lot of steps in Part 1 and Part 2 and now we’re closing in on the final tasks before releasing this sample.
We’ll discuss how we refined inventory management by switching to an item-based currency system, making it easier to drop and share money just like any other item. We’ve also improved dialogue implementation, allowing for easier setup without hardcoding everything. Plus, we’ll cover adding controller support, cleaning up the project before release, and the importance of good documentation.
This wraps up our journey with Team Nthusia (for now), but we hope these insights help other developers working on multiplayer game creation. Let’s get into it!
Refining Inventory Management
In a game like this, sharing items and currency should be as easy as possible. A shared-world simulation needs trading and gifting. Imagine exchanging pumpkins with a friend or giving coins to your neighbor – it adds to the experience.
After adding money as a currency, it made sense to treat it as an item. This allows players to share money like any other item. The conversion was straightforward since a system for dropping and sharing items already existed. This helped Nthusia avoid creating a separate system for handling money. It also streamlined the overall process.
With the switch to item-based currency, players could add or remove multiple items at once. To support this, Nthusia considered inventory slots and stack capacity. Equipment handling became more efficient by introducing an intermediate equipment class. Instead of implementing an abstract property directly, it used type generics for implicit implementation.
public abstract class Equipment<T> : Equipment where T : InteractionBase
{
public sealed override System.Type InteractionType => typeof(T);
}
This further simplifies the process of introducing new equipment:
public class AxeEquipment : Equipment<AxeInteraction>
{
public override bool RequiresInteractable => false;
}
User Friendly Implementation of Dialogue
Now that you can trade items with friends, the world should feel lively, even without human players around. A world feels alive through its population, and NPCs play a key role in creating that atmosphere.
First, dialogue must be implemented in the NPC class. A DialogueHandler component needs to receive dialogue input to function properly. This input can be added in the inspector, along with appropriate response options.
Previously, all dialogue had to be hardcoded as preparation for setting up a proper system. Now, dialogue is structured so that code only handles response actions. Everything else is managed graphically in the inspector.
- Dialogue: stores the speaker’s name, and all lines of dialogue in an array (DialogueBlock[])
- DialogueBlock: stores a single “page” of dialogue, and any dialogue choices the user may make (DialogueOption[])
- DialogueOption: represents a selection the user can make in response to the dialogue. Stores the text which will be displayed on the UI and a delegate to invoke if selected.
- DialogueState: the internal memory of the DialogueHandler, stores the active Dialogue, an Action to take when the dialogue is finished (unused in the sample, but useful in general), and variables for keeping track of dialogue progress and timing, blockIndex, isLineEnded, and timer, representing the game time at which the current block of dialogue began being displayed.
All the implementation options above are “runtime” representations of dialogue with corresponding serializable companions. To set up dialogue in the inspector, the user defines a DialogueObject field or property. Then, calling GetDialogue() allows the DialogueObject to construct a runtime version for use.
Adding Controller Support
To make the game sample more accessible, Nthusia added controller support. Like in Fusion Karts and Food Fusion, controllers fit well with analog stick gameplay.
Adding support is easy and straightforward. The default inputs in Unity’s Input Manager can be extended and adapted for this purpose.
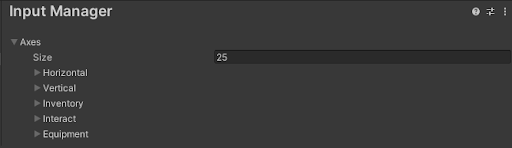
You can navigate to the settings via Edit > Project Settings > Input Manager

Here is an example of assigning a key/joystick button to an action in the game. The supplied name is Inventory, the positive button is q, and the alternative positive button is joystick button 3.
The following image shows us that “joystick button 3” is Y on an Xbox controller. When setting up controls using the default Unity Input system, a reference image like this is useful!

Source: For Life Games
https://discussions.unity.com/t/xbox-one-controller-mapping-solved/187077
One thing to be aware of in the sample: The controller implementation works for the core gameplay loop, like walking around and interacting with things. The inventory and player customization screens were optimized for mouse and keyboard.
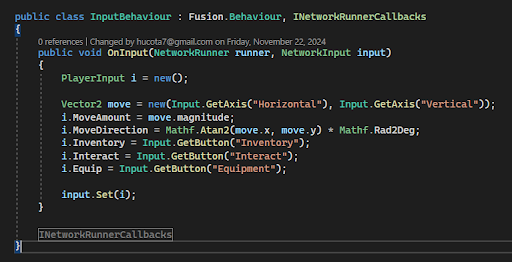
Here in the InputBehaviour.cs class provided in the sample, the Inputs from above are referenced by string. This is why pressing q / joystick button 3 will invoke the Inventory action.
Finishing the Sample and Releasing it
With everything in place, it’s time to finish and polish the sample for release. Before completion, Nthusia reviews the project thoroughly. They clean up unused code, remove unnecessary assets, tie up loose ends, and perform final tests. They also ensure that core functionality is well-documented.
Art assets get polished, including models, textures, and animations. Some of these were placeholders or in an incremental state. Having proper documentation, both in-code and in a document, benefits users and our engineers maintaining the samples.
No worries – Nthusia stayed in constant communication with our developers. This ensured everything worked as intended. Bugs, unclear documentation, and messy code were exceptions rather than the rule.
Another key step before release is testing on different platforms. When releasing widely, consider each platform’s expectations and requirements. Just because it runs in the editor doesn’t mean it will work in a build.
Common issues arise with multithreading and certain shader techniques which vary in support across platforms. Once everything is cleaned up and tested, the project is handed over to us.
The sample’s release is handled entirely on our end. However, we collaborate with the developers to ensure all requirements are met. This guarantees the best possible quality.
Advice and Tips straight from Nthusia
Finally, we’d like to give Nthusia a chance to share advice with anyone interested in developing game samples or partnerships:
“No matter your skill level or familiarity, documentation is your friend! While developing samples, we often have the Fusion documentation open and will refer to the manual as needed.
In this sample we made a custom implementation of NetworkTRSP, of which there wasn’t much documentation to refer to. We weren’t afraid to dig into the code though, and found some essential methods to leverage, the static NetworkTRSP methods Teleport and Render, which provide a default implementation for us to use. Once discovered, the rest of the implementation was smooth sailing, as for our use case all of the heavy lifting of movement logic was provided by NavMesh.SamplePosition
So, what we are trying to say is: Don’t limit yourself and don’t try to re-invent the wheel. Most of what you want to build or try out is already out there. You just need to connect the dots and have an open mind. Photons documentary is built over many years and includes over 100 samples. So to find ways to push forward or come up with solutions for your problems, is just a matter of time and patience.”
Thanks to everyone who followed this dev diary! We hope you found something valuable. If you want to learn more about Nthusia and how we support multiplayer developers, join our Discord or contact us directly
Ready to build your own successful multiplayer game? With Fusion and Quantum by Photon, it’s never been easier to integrate cutting-edge multiplayer features into your project. We offer the industry’s most advanced tools, comprehensive support, and everything you need to get started – from downloadable samples to detailed documentation.
Take the first step today – download Fusion or download Quantum and start building. If you’re looking for in-depth assistance, join our Gaming Circle, where you can connect directly with our developers and get expert guidance throughout your journey.
Your multiplayer success story starts here!
Join us on Discord, YouTube, BlueSky , X and LinkedIn – we can’t wait to see what you create!
Welcome to the final entry in our Dev Diaries with Team Nthusia! In this blog, we’re sharing what it’s like to work with Photon, from the development process to the lessons we’ve learned along the way. We’ve already covered a lot of steps in Part 1 and Part 2 and now we’re closing in on the final tasks before releasing this sample.
We’ll discuss how we refined inventory management by switching to an item-based currency system, making it easier to drop and share money just like any other item. We’ve also improved dialogue implementation, allowing for easier setup without hardcoding everything. Plus, we’ll cover adding controller support, cleaning up the project before release, and the importance of good documentation.
This wraps up our journey with Team Nthusia (for now), but we hope these insights help other developers working on multiplayer game creation. Let’s get into it!
Refining Inventory Management
In a game like this, sharing items and currency should be as easy as possible. A shared-world simulation needs trading and gifting. Imagine exchanging pumpkins with a friend or giving coins to your neighbor – it adds to the experience.
After adding money as a currency, it made sense to treat it as an item. This allows players to share money like any other item. The conversion was straightforward since a system for dropping and sharing items already existed. This helped Nthusia avoid creating a separate system for handling money. It also streamlined the overall process.
With the switch to item-based currency, players could add or remove multiple items at once. To support this, Nthusia considered inventory slots and stack capacity. Equipment handling became more efficient by introducing an intermediate equipment class. Instead of implementing an abstract property directly, it used type generics for implicit implementation.
public abstract class Equipment<T> : Equipment where T : InteractionBase
{
public sealed override System.Type InteractionType => typeof(T);
}
This further simplifies the process of introducing new equipment:
public class AxeEquipment : Equipment<AxeInteraction>
{
public override bool RequiresInteractable => false;
}
User Friendly Implementation of Dialogue
Now that you can trade items with friends, the world should feel lively, even without human players around. A world feels alive through its population, and NPCs play a key role in creating that atmosphere.
First, dialogue must be implemented in the NPC class. A DialogueHandler component needs to receive dialogue input to function properly. This input can be added in the inspector, along with appropriate response options.
Previously, all dialogue had to be hardcoded as preparation for setting up a proper system. Now, dialogue is structured so that code only handles response actions. Everything else is managed graphically in the inspector.
- Dialogue: stores the speaker’s name, and all lines of dialogue in an array (DialogueBlock[])
- DialogueBlock: stores a single “page” of dialogue, and any dialogue choices the user may make (DialogueOption[])
- DialogueOption: represents a selection the user can make in response to the dialogue. Stores the text which will be displayed on the UI and a delegate to invoke if selected.
- DialogueState: the internal memory of the DialogueHandler, stores the active Dialogue, an Action to take when the dialogue is finished (unused in the sample, but useful in general), and variables for keeping track of dialogue progress and timing, blockIndex, isLineEnded, and timer, representing the game time at which the current block of dialogue began being displayed.
All the implementation options above are “runtime” representations of dialogue with corresponding serializable companions. To set up dialogue in the inspector, the user defines a DialogueObject field or property. Then, calling GetDialogue() allows the DialogueObject to construct a runtime version for use.
Adding Controller Support
To make the game sample more accessible, Nthusia added controller support. Like in Fusion Karts and Food Fusion, controllers fit well with analog stick gameplay.
Adding support is easy and straightforward. The default inputs in Unity’s Input Manager can be extended and adapted for this purpose.
You can navigate to the settings via Edit > Project Settings > Input Manager
Here is an example of assigning a key/joystick button to an action in the game. The supplied name is Inventory, the positive button is q, and the alternative positive button is joystick button 3.
The following image shows us that “joystick button 3” is Y on an Xbox controller. When setting up controls using the default Unity Input system, a reference image like this is useful!
Source: For Life Games
https://discussions.unity.com/t/xbox-one-controller-mapping-solved/187077
One thing to be aware of in the sample: The controller implementation works for the core gameplay loop, like walking around and interacting with things. The inventory and player customization screens were optimized for mouse and keyboard.
Here in the InputBehaviour.cs class provided in the sample, the Inputs from above are referenced by string. This is why pressing q / joystick button 3 will invoke the Inventory action.
Finishing the Sample and Releasing it
With everything in place, it’s time to finish and polish the sample for release. Before completion, Nthusia reviews the project thoroughly. They clean up unused code, remove unnecessary assets, tie up loose ends, and perform final tests. They also ensure that core functionality is well-documented.
Art assets get polished, including models, textures, and animations. Some of these were placeholders or in an incremental state. Having proper documentation, both in-code and in a document, benefits users and our engineers maintaining the samples.
No worries – Nthusia stayed in constant communication with our developers. This ensured everything worked as intended. Bugs, unclear documentation, and messy code were exceptions rather than the rule.
Another key step before release is testing on different platforms. When releasing widely, consider each platform’s expectations and requirements. Just because it runs in the editor doesn’t mean it will work in a build.
Common issues arise with multithreading and certain shader techniques which vary in support across platforms. Once everything is cleaned up and tested, the project is handed over to us.
The sample’s release is handled entirely on our end. However, we collaborate with the developers to ensure all requirements are met. This guarantees the best possible quality.
Advice and Tips straight from Nthusia
Finally, we’d like to give Nthusia a chance to share advice with anyone interested in developing game samples or partnerships:
“No matter your skill level or familiarity, documentation is your friend! While developing samples, we often have the Fusion documentation open and will refer to the manual as needed.
In this sample we made a custom implementation of NetworkTRSP, of which there wasn’t much documentation to refer to. We weren’t afraid to dig into the code though, and found some essential methods to leverage, the static NetworkTRSP methods Teleport and Render, which provide a default implementation for us to use. Once discovered, the rest of the implementation was smooth sailing, as for our use case all of the heavy lifting of movement logic was provided by NavMesh.SamplePosition
So, what we are trying to say is: Don’t limit yourself and don’t try to re-invent the wheel. Most of what you want to build or try out is already out there. You just need to connect the dots and have an open mind. Photons documentary is built over many years and includes over 100 samples. So to find ways to push forward or come up with solutions for your problems, is just a matter of time and patience.”
Thanks to everyone who followed this dev diary! We hope you found something valuable. If you want to learn more about Nthusia and how we support multiplayer developers, join our Discord or contact us directly
Ready to build your own successful multiplayer game? With Fusion and Quantum by Photon, it’s never been easier to integrate cutting-edge multiplayer features into your project. We offer the industry’s most advanced tools, comprehensive support, and everything you need to get started – from downloadable samples to detailed documentation.
Take the first step today – download Fusion or download Quantum and start building. If you’re looking for in-depth assistance, join our Gaming Circle, where you can connect directly with our developers and get expert guidance throughout your journey.
Your multiplayer success story starts here!
Join us on Discord, YouTube, BlueSky , X and LinkedIn – we can’t wait to see what you create!